> For the complete documentation index, see [llms.txt](https://docs.kiloiot.io/llms.txt). Markdown versions of documentation pages are available by appending `.md` to page URLs; this page is available as [Markdown](https://docs.kiloiot.io/kilo-iot-server/devices/commands.md).
# Device Commands
Send downlink commands from Kilo IoT Server to control devices — by hand, from a rule, or by asking the AI assistant.
Monitoring tells you what a device is doing. **Commands** let you change it. With Device Commands, the Kilo IoT Server stops being a one-way data pipe and becomes a two-way control plane: you define the actions a device can perform, then dispatch them on demand from the device page, from a dashboard, or automatically from a [rule](/kilo-iot-server/rules-engine/running-device-commands.md).
Almost anything a device can be told to do is a command. Switch a relay or smart plug on or off. Dim a luminaire to 40% and set its color temperature to 4000 K. Push a new temperature setpoint to an HVAC controller. Open or close a valve. Reboot a gateway-attached controller, change its reporting interval, or write a configuration register. If the hardware accepts a downlink, the platform can send it — and it sends it the same way whether the device speaks **MQTT** or **LoRaWAN**.
## Why it matters
Without an integrated command layer, controlling a device means leaving the platform: a separate vendor app, a hand-built MQTT publisher, a script that crafts raw downlink bytes, or a field technician with a laptop. Each of those is an unmanaged path with no audit, no verification, and no shared definition of what "turn it on" actually means for a given model.
Device Commands collapses that into one modeled, reusable, auditable surface:
* **Define once, reuse everywhere.** A command is a named action with typed parameters. Operators execute it without ever seeing the raw payload, byte layout, or topic.
* **Protocol-agnostic control.** The same command concept covers an MQTT downlink to a smart plug and a LoRaWAN downlink to a Class C controller — the platform handles the encoding and delivery for each.
* **Closed-loop confidence.** Commands can verify that the device actually acted, not just that the message left the building (see [Confirming Commands](/kilo-iot-server/devices/commands/verification.md)).
* **Full execution history.** Every dispatch is recorded with the parameters it carried, its outcome, and when it happened — so operations and compliance teams can see exactly what was sent to a device and what came of it.
## Where commands live
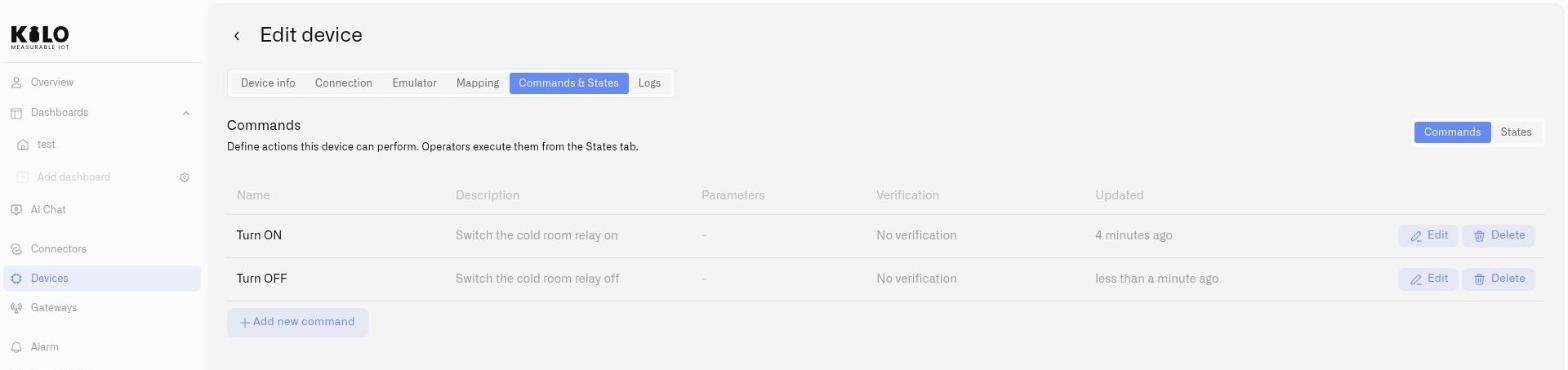
Commands are managed on the device's detail page, under the **Commands & States** tab. The tab has two sub-tabs:
* **Commands** — the design surface. Define, edit, and remove the actions a device can perform. See [Creating Commands](/kilo-iot-server/devices/commands/creating-commands.md).
* **States** — the operations surface. Execute available commands and review the lifecycle and result of every past execution. See [Executing Commands](/kilo-iot-server/devices/commands/executing-commands.md).
The **Commands & States** tab appears for devices that can receive downlinks:
* **MQTT devices** — any device connected through an MQTT connector.
* **Class C LoRaWAN devices** — Class C devices listen continuously and are always ready to receive commands, so the tab becomes available once a device is configured as Class C. (Class A devices only open a brief receive window after each uplink, so they are not eligible for on-demand control.)
* **Emulated devices with Support commands enabled** — an [emulated device](/kilo-iot-server/devices/emulated-devices.md) behaves like controllable hardware, which lets you define and rehearse a full command workflow before the equipment exists.
A device is considered **controllable** once it has at least one command defined — that is also what makes it selectable for a dashboard [Control widget](/kilo-iot-server/dashboards/adding-widgets/control-widget.md).
## Prerequisites
Before you can control a device, make sure:
1. **The device can receive downlinks** — it is connected over MQTT, it is a Class C LoRaWAN device, or it is an [emulated device](/kilo-iot-server/devices/emulated-devices.md) with **Support commands** enabled.
2. **At least one command is defined** — an empty device exposes nothing to execute. Start in [Creating Commands](/kilo-iot-server/devices/commands/creating-commands.md).
3. **You have the access to manage or execute commands** — defining commands and dispatching them are governed by your organization's access policy.
4. **Parameters are valid** — when a command takes inputs (a brightness level, a setpoint), the values must satisfy the limits set on each parameter before the command will send.
## How control fits together
There are five ways to send a command to a device:
* **From the device page** — the **States** tab, where you execute any of the device's commands and review their history.
* **From a dashboard** — a [Control widget](/kilo-iot-server/dashboards/adding-widgets/control-widget.md) binds a command to a Switch or Button so anyone with dashboard access can operate the device without opening its detail page.
* **From a rule** — the [Rules Engine](/kilo-iot-server/rules-engine.md) can now dispatch a command automatically when a condition is met, using an Execute Command node. The same command you run by hand is sent by the rule with no one in the loop — so an out-of-bounds reading at 3 a.m. closes the valve itself. See [Running Device Commands](/kilo-iot-server/rules-engine/running-device-commands.md).
* **By asking the assistant** — the built-in [IoT AI Assistant](/kilo-iot-server/ai-assistant.md) lists what a device can do, runs one of those commands after showing you what it will send and waiting for your confirmation, then reports whether it was delivered. See [Building with AI](/kilo-iot-server/ai-assistant/building-with-ai.md).
* **From your own AI client** — connect ChatGPT, Claude or any other MCP client and it can do the same, scoped to your permissions and recorded like any other dispatch. See [MCP Server](/kilo-iot-server/api/mcp-server.md).
Every route ends in the same place: the command definitions on this tab, the same execution pipeline, and the same history. Defining a command well is what makes all five safe.
The Alarm system works alongside all of them: it makes sure the right people are told when a condition is met — whether or not a rule has already acted on it. Acting and alerting are complementary, and a single rule can do both: contain the problem with a command *and* raise the alarm so the team knows.
Continue to [Creating Commands](/kilo-iot-server/devices/commands/creating-commands.md) to define your first action.
---
# Agent Instructions
This documentation is published with GitBook. GitBook is the documentation platform designed so that both humans and AI agents can read, navigate, and reason over technical content effectively. Learn more at gitbook.com.
## Querying This Documentation
If you need additional information that is not directly available in this page, you can query the documentation dynamically by asking a question.
Perform an HTTP GET request on the current page URL with the `ask` query parameter, and the optional `goal` query parameter:
```
GET https://docs.kiloiot.io/kilo-iot-server/devices/commands.md?ask=&goal=
```
`ask` is the immediate question: it should be specific, self-contained, and written in natural language.
`goal` is optional and describes the broader end goal you are ultimately trying to accomplish on behalf of the user. GitBook uses it to tailor the answer towards what is most useful for that goal.
The response will contain a direct answer to the question and relevant excerpts and sources from the documentation.
Use this mechanism when the answer is not explicitly present in the current page, you need clarification or additional context, or you want to retrieve related documentation sections.